Showing posts with label floral wreath. Show all posts

Wednesday, April 15, 2009

Wedding Wreath {Stephanotis}

I'm so upset I broke my camera...*sob*
There I was, flashing away on a floral arrangement I made, next thing I know the camera goes completely white! Like the aperture is not working or something???
My camera is less than a year old and I broke it. :(
So I am digging in my pictures of florals past and found this to share with you.

We got some fresh stephanotis donated and I worked on this
fresh floral stephanotis wreath in the shape of a heart with Ruby.
Perfect for a wedding and smells heavenly.


This baby took 125 fresh stephanotis!!!!
Holy moly, that's a lot of flowers but it smells SO good and it's so pretty I know some bride out there may want to splurge on something like this for her ring pillow or sweetheart table. :)
What's something like this cost you ask?
Between $150 and $375 depending on who makes it for you!

Tuesday, August 19, 2008

Fresh Floral Wreath for a Wedding Tutorial

So you wanna make a wreath, huh? Well you're in luck! I made a little DIY tutorial on how to make a floral wreath made out of fresh flowers for a wedding or event.
It's pretty easy to make and you can use just about any flower your little heart desires as long as you properly process your foam and flowers.


First you need to figure out what you want your wreath to look like. You'll need between 30 to 40 flowers depending on the size of the head of the flower. Gerbera Daisies take up more space than say regular white daisies. You only need about a dozen peonies to make a nice wreath. So keep in mind the design you are after when choosing flowers.

I used Carnations, gerbera daisies, orange tiger Lilies, a few billy buttons, and a couple kermit mums and a few yellow alstromerias.

Step 1.

Buy a foam floral wreath from a floral store or flower market. I used the one with a tray glued on because it's easier to place an object in between without having to get a separate tray or worry about water possible dripping onto the linen.


If you want to make a hanging wreath for a door then you would buy one of these foam wreaths
without that center tray. Sav on Crafts has them but a local flower market always has them cheaper. I think I bought mine for about $7.

Step 2

You must submerge and saturate the floral foam in water and like all foam you must let it sink on its own. You MUST NOT push it down or else you may inadvertently create air pockets and when you go to stick your stem in , your flower will have no water source. You might end up with mysterious sections of your wreaths that are wilting fast. So since I have a tray attached, I flip it upside down and let it sink on its own and keep it there for about 5 minutes.
*Note* The water that I use I treat with floral food following the instructions on the package.


Step 3
I then pull it out and let the excess water drain and then let it rest for a few minutes before I get started.


Ok, I stopped to take the time to give you a tip. See how the carnation has a little "knub" for a lack of better word? Its like a knot that appears in carnations every 2 inches or so? Well if you cut it right at the knot, the flower will not get any water. You need to cut about that nub( or a bit below, in order for the stem to drink water)


Step 4
So start to cut the stems about 2 inches from the head. I start with a few so that I get the length right. Once you poke a stem into the foam, that's it. You can not pull it out and re-insert because it's not a sponge, it doesn't spring back. There will be a huge gaping hole that you cannot fill unless you stick in a bigger longer stem, but even then it's not right, so take your time. The idea is to start designing a pattern that you are happy with. I started with the darker carnations and spaced them out.


Then I filled in with more flowers.


Sorry about the flash, but here's a closeup of the spacing between each stem.

Here's a top view to show you how the inside will look, I always leave a space to be filled in later once I have the final piece that will be used and I can fill in the holes so that you can't see my mechanic(the method I use to construct my floral design). You never know what angle the photog will be taking pictures from so make sure you face flowers up and in leaving a space for whatever will go in the center. Here I used a small vase to stand in.

Here's the final picture before transport. I'm not feeling the mums too much in this one so for the wedding I pulled them out.

Here she is in action with the bride and grooms memorial candle on the sweetheart table.

This is another floral wreath I made for the wedding, for the sign in table. I used red spider daisies. About 35 of them went into this wreath. People kept asking me if they were real, haha, I got some "yeah right' looks about them. :)


I placed a vase with submerged daisies in them and used black rocks to weight the vase down so it wouldn't tip over in case someone bumped into the table. They were transported separately.

Here he is in action!


You can make these about two days before the event and then just shower them with water in the sink and drain a little water out. They should be fine and can last beautifully in this wreath for about a week as long as you continue to water every other day.

I hope you found this helpful! If you have any questions, ask away!

Thursday, August 14, 2008

Daisy / Rust Wedding- First Pro pics in!!!!

Vincent Au shot the beautiful couple in Berkeley August 2, 2008.
What an incredibly nice and super stealth guy! I swear he was every where and he was soooo patient with all the family and friends clamoring to get a shot of the bride and groom alongside him. I have personally had photographers get snippy with the family for crowding them.
I totally understand they are at work and they are the pros but can't they just be nice and cuddly? LOL!

This wedding was a beautiful Daisy wedding.
Her colors were Chocolate Brown, Rust Orange, and Cream.
Here are some of the pictures that I received. There are hundred of fabulous preliminary shots so I just picked the ones that I really liked the most.

Here I am in action. I was pinning on a fake corsage for the Grooms mother. She is allergic to flowers, I think? Maybe it was the Daisy? Anyhow, she needed a fake one made so I made it out of Daisies from Michaels and a little bit of glue from a glue gun and floral tape and viola, in pictures you can't really tell they are fake. This was a first for me :)


He got the shot that I couldn't take of the monogram and the front of the ceremony "altar".

This never gets old.
I *LOVE* the look on the grooms face as he waits for the Bride to make her entrance....so romantic.

I am really pleased with the bouquets.
The MOH and Matron of Honor had different dresses so I made the bouquets different for each as well.
Yay! Cake shots :)

The cutest little favors contained chocolates inside the boxes and were topped off with a Daisy.


This is a picture of bliss defined....

They are so cute and the weather as you can see was GORGEOUS!

Fabulous Rings shot
A cute back shot of the couple's sweetheart table.


Ahhh....good times. I loved the colors: Chocolate Brown, Rust, Orange, Pops of Yellow, Deep Reds and a touch of Burgundy to make the brighter colors standout.The Daisy wedding went down without a hitch and I am so happy for them!

They lived happily ever after.....


Tuesday, August 5, 2008

Daisy / Rust Wedding- The beginning details

Here are a few details of my pre wedding set up. I'm still recovering from my cold and went out for a bit today to meet with a new bride so I'm still feeling a bit under the weather and now my focus is switching to my Orchid wedding that's happening in a few weeks.
I must say that I absolutely *love* all the brides I have had the pleasure of working with so far. All have been gracious, creative, incredibly nice and so open to my ideas and suggestions. I hope that I can serve them well.

Here is a bouquet I made for the bride so she would have a real bouquet for her rehearsal walk down the aisle.
It took a ride with me in the front seat :)


I made her a wreath so she could put her "In memory of Candle" at her sweetheart table.
I thought it was a wonderful way to acknowledge all the family members that could not be there.


This little funky guy sat at the guest sign in table.
All I heard was:
"Hey this is cool..wait are these real?? They're plastic...right?"
Nooooo they are red Spider Daisies. Cute huh?


These little ladies gave our card box some color.

I made these mini pomanders just to add some height behind the card box and on the table where her gifts would be placed. She hadn't registered anywhere so she thought that maybe if someone felt inclined to give her a gift her family would bring cards. So rather than flank her table down with a big floral arrangement I opted for some color high and in the background.
I made tutorials on the pomanders and on the wreaths so I will share a little later.

Next I will start to post some pictures of the details, like the cake, the card box, the centerpiece ect.

Wednesday, July 30, 2008

Open Letter to Gypsophila {a.k.a. Babies Breath}


Dear BB,

I have hated you for as long as I can remember.
Why? Because your name is synonymous with red roses and 1980's weddings, and big poofy wedding dresses with outrageous lace sleeves. You often look antiquated and I really hate it when you are inserted as a filler into perfectly good bouquets.You have even managed to give carnations a bad name by association and frankly, you irk me.

But I had second thoughts when I saw Mrs. Strawberry from Weddingbee pull this beauty off.


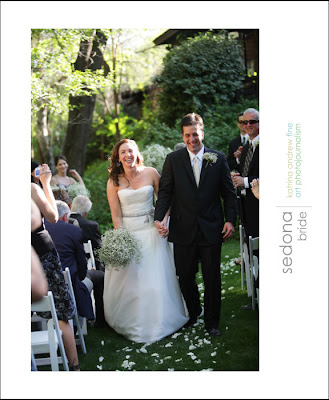
But it was solidified when I came home and stalked, uh, checked, The Brides Cafe for this real wedding from Sedona Bride


Okay, everyone in my life knows I have a fascination with candles, and damn it, candles on a mantle? Stop it.
Look at that wreath, it's made out of*gasp*
babies breath.....and I love it!


So I apologize, BB, I no longer hate you.
Provided, of course, you come in mass form and there is not one red rose or green fern for miles around! haha...*cough* sorry.